Sunday, October 25, 2009

Stainless steel backsplash is the winner.

Just bought our backsplash from cooltiles.com.  5% off with coupon code "KnobCust101."  We bought the stainless steel penny rounds and the decision is OVERWITH, DONE.


I'm breathing a sigh of relief and I'm a little surprised at how fast I dropped thoughts of a glass subway tile.  I found exactly what had mesmerized me in a Modwalls picture for HALF the price.  So I need to settle in and enjoy that I got my fantasy backsplash - but right now I'm just glad a decision's been made and we don't have to go back and forth and worry about it anymore.

Shipping in a few days, up on our walls soon!

PS hardwoods are getting sanded and then stained later this week.  Pretty excited about that.

How shoddy Photoshop skills help you make decisions.

So we narrowed the backsplash down to either the stainless penny round tile or the 1x2 glass subway tile in "Morning Mist," a gray-green.

And we really like either one.  A lot.  And the difference in price is about a dollar or two a square foot.

So this was what we resorted to in a state of desperate indecision:


The glass tile doesn't have any white grout, something it WOULD have if we put it up, but . . .

Pretty much sold on the stainless penny rounds now. 
I'm still scared to place an order.
I don't know why this decision was so tough - I think it's because I've always wanted a really pretty backsplash and I've wanted glass tile on it forever, so it's hard to let go of that.  But the stainless is really cool . . .

Yeah?

Saturday, October 24, 2009

Sigh.

Calmer now.  A little.  But still feeling pretty powerless about this stuff, and it's frustrating.  There's a huge push to get things done and get in there, but we're just bumping up against a wall when it comes to the stuff we're not skilled enough to do.

Doing that thing where you remind yourself about letting go of what you can't control . . .
It's just hard when that involves where you live.  Hot button issue to say the least.

Anyway, gonna spend today focusing on what I CAN control - packing this apartment.  Lord.

Monday, October 19, 2009

PPS


This (these) is (are) the face(s) of doggy daycare.
I'm officially a fan. And so is he.

A quickie: granite edition.

I was going to write the big WE GOT OUR COUNTERTOPS! post tonight, but it's way past my bedtime and there's a warm, sleeping dog on me and I'm just not feeling it.
BUT.

I DO want to post just one lil' baby pic right quick.


Freshly mopped floors (probably need one more cleaning to get rid of the rest of the grout haze), a newly mounted apron sink, and frigging MIRROR-LIKE ubatuba granite countertops.
There's so much there in that picture that makes me happy.

Jeff's putting on cabinet fronts and installing the stove and microwave tonight/tomorrow, I believe.

I keep thinking about the different stages this room has gone through in the past couple of months and I'm kind of floored that it's really starting to look like our kitchen now.

Can't wait to post before and afters, oh my gosh.

Anyway. More tomorrow.
Tonight, bed.

PS:


Ahhhh that sink and faucet are so hot.

Friday, October 16, 2009

Enter the tile gauntlet.

So I'm finally getting around to updating about the tile we laid on Monday.

I took the day off work and we started at 8am. By the end of the day, I had pretty much learned the entire process. I'll recount it here for those who have never done this. If I sound like I know what I'm talking about, it's all a charade.

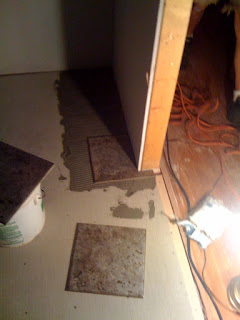
So to start off we made the mortar (obviously) and cut the first three tiles to start off in the corner and also integrate with the transition. Mixing the mortar struck me as being really similar to making cake batter: you throw the stuff in the bucket, add some water, mix it up with a drill attachment that's basically a huge whisk, and add more water and/or mortar as needed until it has the consistency of cool whip. On the first round, Jerry mixed up a bit too much and almost burned up his drill.
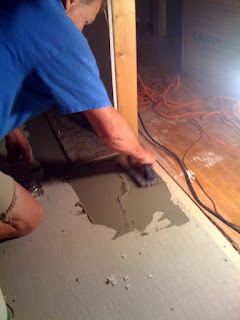
Spreading mortar properly is also an art that's not nearly as easy as it looks. First you scoop it out of a bucket and slap it onto the floor. We used a big rectangular trowel that has two smooth sides and two notched sides. With that, you spread it with the smooth edge as if it was butter on toast, and you go back with the notched side and make even grooves in it. The lines help make contact with the underside of the tile. It's also really important that the amount of mortar you use for each tile is homogeneous, because a tile can sit too high or too low and that's just not something you want (we had a pull up a few tiles throughout the day and add or take away mortar depending on its level.)

After my first few ham-handed attempts to spread it evenly, we fell into a fairly efficient process of Jerry spreading mortar ahead of me as I went from behind and laid each tile. The process for laying the tile itself is pretty simple; you just lay it on the mortar and wiggle it a bit, then scoot it into place. We used 1/8" spacers to make sure everything stayed even, two for each side. That way everything stays nice and straight, because you don't want to lay a whole row and then realize that it's all wrong.

It took about an hour just to get the first row laid, because this is a really big room. In total, we have at least 300-350 square feet. Since we were laying the tile in a brick pattern, we had to cut the first one of the second row in half to stagger the pattern. Jerry told me that I should cut the tile, so it was time for me to learn how to use the wet saw.

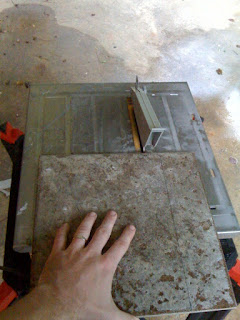
A wet saw is a special type of saw used to cut various types of tile, including porcelain. It's just a stationary saw that sprays water on its blade while cutting. They usually have various types of guards to help you cut straight, but Jerry of course did not bring them so I had to figure out how to cut straight on my own, which is basically just a matter of pushing the tile straight through and not letting it get off track. As the picture to the right shows, we just measured what we needed, and drew a line. Not exactly rocket science. But it was my first time using a wet saw, so I figured it was worth at least a little documentation. I was ok at it, my first cut was good but I ended up psyching myself out on later ones so a few subsequent ones were a little crooked near the end. Those edges went against the wall, so getting them completely exact wasn't super necessary. Towards the end of the day I was comfortable enough to do all the cutting and they all came out ok.

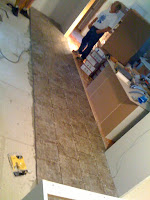
It was a long job. We only had about four complete rows done by lunchtime, when we took a short break for lunch after my mom was gracious enough to bring us some pizza. We stood around and ate for a bit, then got back to work.

Once we got towards the wall there was a bit of strategery involved, since it had to be done in a way that wouldn't block us into a corner or a narrow space since you can't walk on the tile for 24 hours once it's been laid. So we laid just a few tiles for the subsequent rows and began to work outwards from the wall, whereas before we were going straight out from the corner. I think this was where I started to reach my limit, because at this point we had been at it for a really long time. We thought about quitting around 5pm, but since were so close to being done we pressed on. Originally I had thought we would just tile underneath the cabinets, but eventually we decided just to cut around them, because it wouldn't have been good to let the cabinets sit there on wet mortar.

Finally around 6pm our last bucket of mortar ran out and we decided that was a good stopping point. After cleaning up, I finally left for home around 7, so it was definitely a day on which I appreciated my white collar job. Jerry's role was crucial, so I'm also incredibly grateful that he helped so much.

But words cannot express how pleased I am with how it came out. Andrea really knocked the ball out of the park by picking out this design. I think with each successive row we put down, I fell in love with this tile more and more. Once it's all finished, I think it will look really sharp with our stainless appliances, white cabinets, and dark granite countertops. I can't wait to see the final result.

Wednesday, October 14, 2009

Just a quickie.

Floor in the kitchen is done, and pictures will be coming soon. It looks pretty cool. Jerry came over there today and grouted it all without us even asking for help; that meant a LOT. Gotta think of a way to thank him.
Nate'll have a big tile post up shortly.

Our countertop folks have already templated and they're coming back to install on Friday. Ubatuba won, and we're getting it for $28/sq ft. Pretty amazing.

They tried to screw us on backsplash pricing, though. So we're back to the drawing board on that one. I just ordered some samples, 'cause we're pretty stumped on what to choose. Hopefully seeing them in person will help. ANNNNND I found stainless steel tiles in penny rounds, hexagonal rounds, and 1"x2" subway for HALF what Modwalls is charging.

Here the samples am:


Click 'em if you want to know more about 'em.


But yeah, hoping that we'll finally be able to make a decision on this soon - it's the one thing that's really been making me nuts.


And of course I went looking at more wallpapers. Speaking of decisions.
I'm gonna go with choice #1 from that other post though, I think. We'll see after the samples get here.


Buying and painting/installing beadboard this weekend in the dining room, bathroom, and hallways. If it's easy, I'm wanting to put it on our bedroom ceiling.
Need to buy our can lights, too.

Then doors.
Also, need to book our flooring dudes.

Ughhhh I hope I can switch my brain off and go to sleep soon.

Anyway - any thoughts on those backsplash choices?

Thursday, October 8, 2009

Hooray IKEA!

We're battling guilt today because Walt was in his crate for a ridiculous number of hours - work, haircuts, IKEA for both of us mean we got home at 9, with a half hour break in there from 3 - 3:30. Nate's dropping off the final cabinets at the house now. I came back to get the puppy out and try and cram a day's worth of playtime into the hour before bed. Sigh.

I love IKEA. And oh, I hate it.
They're having a kitchen sale - 10% off any purchase of $2500 or more, 15% off if you buy an appliance with that, 20% off if you buy (I think) 3 appliances.
We bought our stuff THE DAY BEFORE THE SALE BEGAN. Nobody said a word to us about it. Not exactly loving that, BUUUUT customer service went ahead and gave us the discount. So we just got $472 back on our kitchen!!
I love that. Love it. LOVE IT.

They also have exact, if not BETTER versions of all the mirrors I've been checking out on Pottery Barn lately. I got a great big huge etched glass antiquey mirror to go on the wall for my vanity desk for FIFTY DOLLARS. Matches the little one I got from Urban Outfitters for $24.99. I was shocked at that. These things are usually SEVERAL hundreds of dollars.

It's shaped a bit like the one on the right, but it's etched like the one on the left. Couldn't find the actual product online, but oh, it's perfect.


There's a long oval beveled mirror for the wall above the banquette seat in the dining room and that sucker's like $29.99. WHAT?

PB's selling something along the same lines for around 300 bucks. I'm gonna hang it horizontally like that, from a leather strap attached to each side. Stick it right up on a nail. ANOTHER element of my dream kitchen, NAILED! FOR CHEAP!!!!

They also have a couple models for floor lengths that we can use in the guest room and in ours.
The Jondal mirror is $49.99. Has the contrast stitching.


The next is the Mongstad, for $99.99.


Love them, want them. Bought that first one, waiting to get the other two.

Also, where can I put this?


Vanna, $29.99.


And here's a chandelier to go over our dining room table:


Kristaller, $39.99.


Mirror for the main bathroom I'd like to be the owner of:


The Frack mirror, $4.99.


Medicine cabinet maybe?

Fredden, $99.99.

or


Flaren, $99.99.


Anyway, we have our remaining cabinets taken care of and we have that etched mirror for my desk, and the rest . . . we have to go back for.

Which means hours of walking and waiting and figuring and choosing and finding the flat pack boxes in the giant warehouse below and standing in line for ages. 'Cause that's what we did this round. Plus dealing with the kitchen customer service people. Plus the regular customer service people. 2 and a half hours in IKEA makes me want to scream.


BUT. I'm really happy I found solutions to a couple things that were making me worry about compromising what I wanted in order to fit in the budget.

Now I just need to finish report cards and get a wedding gift framed correctly before tomorrow night . . .

I'm going to bed.
HOORAY $470!!

Goodbye linoleum.


And now it's time to interrupt your inspiration pics for the real thing.

I laid down most of the hardie board yesterday, with the help of Jeff and Jerry. This is something that had been weighing on me considerably, because there were a lot of different ways to do it and even more ways to screw it up. The biggest problem was the old linoleum and what to do about it. In some places there were two layers of it: one brick pattern that was put down in the 90s, and underneath it was a bona-fide 60s style linoleum that probably came with the actual house. The second layer came up pretty easy, but the old stuff was apparently glued at every square inch. As we found with the bathroom tile, they really made this stuff to last back in the 60s. I was also worried about the unevenness, since there were gaps where there was no linoleum at all because cabinets previously occupied those spaces.

I gave up on pulling up the old stuff pretty quickly. That left us with the problem of how to get the hardie backer to bond to it. Jeff suggested that we use mastic glue and liberal amounts of screws, which would bond to the linoleum. Only problem is that that stuff is super expensive, and would take forever to do. And then a guy at Home Depot suggested that all you need is a little bit of liquid nail and some screws around the edge to make it bond. He was very adamant, pretty crazy, and fairly convincing. Jeff wasn't really a fan of this idea at all, and suggested the crazy guy did it that way because he wasn't actually living in the place in which he used this method. He thought that we'd eventually end up with cracked tile. Fair enough.

So we figured out a third and much more pleasing option: nails, nails, and more nails. We ended up getting a pack of 2000 barbed nails, and went to town on the boards with a nailgun. I put a nail in every space there was a cutout for one, and then some more in some spots where needed. Each board probably has at least 64 nails in it, so it's not going anywhere. For the spaces where there were gaps, we took pieces of the pulled up linoleum and put them underneath to even out the space.

Using a nailgun is pretty fun, I have to say. The work also went quickly - we were mostly done in about 90 minutes, plus around another 45 minutes just to make sure each board had enough nails in it (and waiting for the compressor to catch up, you can only put about nine nails in before it has to cut back on to catch up.)

In the pictures if you look closely, you can see the gridwork of nails. I have to say that I'm pretty pleased we came up with that solution. In the second picture, you can also see the tentative location of where the island will be (which is shorter than normal, since it doesn't have its legs on yet.) The cabinets are slowly making their way onto the walls, and tonight we'll have to go pick up a couple that were initially missing from our original order. So I'm thinking we will hopefully have all the cabinets up in the next few days. The fun part about this is that once the bottom ones are in we can have countertop people come out make a template. I am definitely looking forward to granite countertops.

But next up is tile, and I'm hoping we'll be able to pick that up from Floor & Decor sometime in the next few days. I'm actually looking forward to tackling that one, since I've been watching people lay tile on HGTV for about two months straight now. But at the same time I'm bracing myself for how much time it will take, since it is a really big space. It's times like these when life should be more like home improvement shows, where you see a person starting a job and moments later it is all finished.

Wednesday, October 7, 2009

Inspiration pictures, take II.

Never say die, right?
Let's try this again.


Love a lot of elements in here that would work really well in our bedroom. The wall and flooring colors are really similar to the ones in ours, and I love the beadboard ceiling and natural fiber window treatments. Sconces on either side of the bed I could take or leave, but I'm interested enough to look around for some. Love the idea of a giant rug and the chair at the vanity's awfully cute.


Another beadboard ceiling. Hm.
I like this for living room ideas. Neutral furniture and walls with little pops of color/print/texture.


Do want. For the living room. I don't know when I went way overboard for anything geometric, but, uh . . . I did. For sure.


Aqua, orange, green, grey. Kind of a mishmash of all the colors we're using predominantly in the house. Wonder how I can divide some of these elements up amongst the rooms . . .


Blogger's being SUPER WEIRD today, so I'm leaving well enough alone and ending the inspiration pics right here. Time to go teach some math anyway.

Pictures = ideas = decor overload.


This is a nursery, but the use of yellow and red with that wall color is making me wonder about how to handle the office . . .
They're so pretty and energizing in there. Black and white would be a little more masculine (which, since Nate's gonna be spending time in there, is important), but there's something REALLY charming about cute little prints with happy colors.

10 bucks says Nate will see this and say "NOPE!"


Another nursery (I swear I'm not pregnant), but wallpapering the ceiling is the coolest idea ever. It's Sherwin Williams, I recognize it Julia Rothman for Hygge & West. I've been looking at too much wallpaper lately, but Lexa holds it down for me.
They have it in a grey version . . .
But man. I have a feeling that wallpapering a ceiling is also the toughest, most tedious thing ever, too.

Ummmmmm speaking of tedious, I had a ton of pictures that followed these but when I tried to update, it gave me an error and this is all that auto-save kept.


Not gonna give up and scrap the rest, but I sure as crap ain't doing it all over again right this second.

Gr.

Tuesday, October 6, 2009

Progress pictures: bedrooms.

Nate, his mama and Jerry painted the bedrooms and they're so lovely. They didn't need to cut in at the ceiling or floor because we're doing crown molding and baseboards. These are iPhone pics, so the lighting might not accurately reflect the colors, but everything's very beachy and peaceful. It's also pixelated a little 'cause I enlarged them after uploading . . . so lazy, I know. We'll get better pics soon.
Anyway, we're using Porter Paints for everything, since Cobb County Schools employees get a big discount. A gallon of flat for roughly 9 bucks, a gallon of semi-gloss for 10.

The master bedroom, in April Sky:


This is the wall where we're going to add larger windows.


The office, in Salty Sea. It's somewhere between aqua and Tiffany blue, and we're gonna play it down a little by keeping a black and white color scheme in the curtains, art, and organizational stuff.


The guest bedroom, in Grey Stone:


They'll all pop even more once the molding is up and the floors are stained that deep, deep brown we love.

We also decided that, since the master isn't as big as we'd like it to be, we're going to add IKEA wardrobes in the guest room along with my makeup vanity and treat it essentially as our giant walk-in closet. The closet in the master will be full of hampers for dirty laundry, and the clean stuff all goes in the closets in the guest bedroom.
Still gonna make sure it's cozy and comfy in case of overnight guests, though.

The next post will hopefully be pictures of the drywall and the cabinets, but for now, I have to end with a picture of my bathroom vanity with the vessel sink we'll attach to it. 'Cause I love it and can't help myself, even knowing that this isn't exactly a glamorous photo of it.


It's all coming together. That's one of the fun parts.

Things I bought.

It's kind of hard to get used to the fact that we're spending real sums of money here. Like, hey, we just bought toilets for both bathrooms and we didn't have to hem and haw and stick it on some Buy It Later list - we put two in the lil' online cart and bought them. Done.

Today was a purchasey kind of day - lots of stuff taken care of.

I decided to get wallpaper samples, because I really just need to see them on the wall, in person, to make up my mind.

One:


Two:


Three:


Four:


Number one is the front runner.


Sconces for either side of the bathroom mirror:

Oil rubbed bronze strikes again.


Pottery Barn has some great apothecary accessory stuff for the bathroom:


Got the wastebasket, the soap dispenser, the tray, a toilet brush holder, and the small and medium canisters. So basically everything but the soap dish, toothbrush holder, and tissue box cover. (Found them cheaper on Amazon, PS.)

Toilets are both Toto Drake models.


I mean, it looks like a regular toilet. I know. But our contractor was telling us that these things can flush golf balls. Something about the flushing system having a valve that's twice as big as normal toilets?

Urban Outfitters was having a free shipping deal, so I checked out the sale section.


Silhouette hamper, $19.99. For paper/craft trash that'll be generated in the office.


Antiqued mirror tiebacks, $12. For the curtains in the living room.


Triple hook, $6. Got them for the backs of the bedroom doors.


Double hook, $6. For the backs of the bathroom doors.


Key-in-lock hooks, $28. Extra hooks/jewelry or headband holders for my bathroom.


Etched glass vanity mirror, $24.99. For my makeup vanity/desk. It's small though, so I think I'm gonna need to get a larger one for the wall.


Giant cable knit throw, $39.99. Our bedroom color scheme is light blue, dark brown, white and orange.


Velvet pouf pillow, $20.


So. Those are the latest little feathers we (. . . I . . .) bought for the nest.
We need to write a separate entry with pictures of the painted bedrooms, the drywall, and the cabinets that ARE NOW MOUNTED IN OUR KITCHEN!!!!!

Chugging along. Catching myself daydreaming about peaceful mornings in this new place, and chugging along.